Stephen Darori is a Social Media Expert,Author, Publicist,Finance and Marketing Whiz , Strategist ,Journalist, Editor Prolific Blogger. Editor. You can follow Stephen Darori on Twitter, Facebook, Linkedin and other Social Media Platforms.
Stephen Darori & Associates has led major Social Media and Digital Campaigns for wide ranging clients that have included Hilary for America, the Democratic Party ,Democratic Alliance ( South Africa), Fortune 1000 companies and Shabbat.com
Showing posts with label The Darori Foundation. Show all posts
Showing posts with label The Darori Foundation. Show all posts
You know the feeling. You’ve spent thoughtful, planned time snapping the perfect picture, applying precisely the right filter, and crafting a caption to make even Hemingway swoon. You hit post and wait for the likes and comments to light up your screen. But an hour later you find the response to your opus is underwhelming. What went wrong?
The thing is that you can indeed take a great shot and create some well-thought-out wording to caption it, but there are a few simple tips to consider with your posting habits on Instagram to get a bigger piece of that engagement pie and the app’s more than 500 million users. And it doesn’t have take a lot of time or effort for you to get all of the likes.
1. Save relevant hashtags to quickly paste into your posts
Hashtags separate content on Instagram into categories. So when you use hashtags properly, users interested in what your brand is all about can find you before they’ve heard of you. For example, if you’re opening a new coffee shop in Vancouver in two months called Bean There, Done That, chances are people won’t be searching #BeanThereDoneThat. But if you use hashtags like #YVRcoffee or #VancouverCoffee, fellow coffee junkies are more likely to scroll upon you.
Investigate before you hashtag by using the Tags category in Instagram’s search. It allows you to see how many people have used a hashtag and those related to it. While you might think #YVRbeans is clever and useful, a quick search shows that (as of today) it has only been used twice. On the other hand, using #coffeejunkie means your post has over 55,000 other posts to compete with. Try experimenting with different combinations to see what works for you.
Once you have a set of Instagram hashtags that are relevant to your brand, you can save them in your phone—in Notes if you use an iOS device, for example—for quick copying and pasting into future Instagram posts.
2. Hide your hashtags to unclutter your captions
With Instagram’s October 2015 update, you can use up to 30 hashtags in a post and hide all of them so that your existing followers don’t have to look at that visual mess and users searching that hashtag can still find your posts. There are two ways to do this:
Method No. 1: Once you’ve captioned your post, leave a comment on it using your hashtags. The hashtags will all be hidden once a few more comments are made.
Method No. 2: Alternatively, if you’re building up your following and aren’t getting enough comments to hide the hashtags, you can bury them under periods separated by line breaks. In the caption or comment box, tap the 123 key. Select return and then enter a period. Repeat those steps at least five times. Comments are hidden after three lines, so by repeating this five times (or more) and then entering all your hashtags, users won’t see them.
Instagram is one of the biggest stars in the social media space, but you’ll miss connecting with all of the potential customers out there if you use Instagram and Instagram only. By publishing your posts to Facebook, Twitter, and other social networks, you can see huge gains in engagement. On Facebook, posts with images have the second highest engagement and posts made with Instagram increase engagement by 23 percent.
It might sound daunting to wrangle all your socials together to be streamlined with Instagram, but there are a few simple things you can do to make it easy. Instagram gives you the option to link your Facebook, Twitter, Tumblr, Flicker, and Swarm accounts directly to the app. Before you publish your post, simply toggle the accounts that you’d like to share said post with.
Keep in mind that not all users tagged in your comments or caption will have the same username across other platforms and in turn, you might not notify who you intend to notify or might not notify anyone at all.
The other simple way to do this is on the Hootsuite dashboard. Learn how to add to Instagram to Hootsuite and start scheduling posts and sharing them across multiple social networks.
4. Only post at the most optimal times
If a tree falls in the forest and nobody’s around to hear it, it doesn’t make a sound. Similarly, if you post at a time when nobody is scrolling, you’re not going to reach anyone. Know your audience and post when they’re using Instagram. While there is no secret formula for timing, there are some general recommendations to use as a guide:
Hubspot: Anytime from Monday to Thursday except from 3 p.m. to 4 p.m.
Of course, you don’t have to wait for the clock to strike five to manually upload your content. Compose and schedule your posts on Instagram by publishing through Hootsuite.
In the old days, reposting someone else’s photo on Instagram—regramming—meant taking a screen capture of the photo on your feed, reposting it to your own feed, copying the original caption, and then tagging the original user who shared it. Luckily, it’s much easier than that now. Sharing content posted by your followers, accounts you follow, and other relevant Instagram users is an effective way to increase your visibility and engage your online community.
Make sure you brush up on your regramming etiquette before diving in. There are some simple dos and don’ts to follow, like getting permission and crediting the original account so that everyone benefits.
6. Create and post compelling video in no time with Boomerang
Video brings a whole new dimension to your Insta game and visual identity that, if done well, can engage your audience in a way stills can’t. Video used to be something left to the experts, but now that Instagram has added Boomerang and extended its maximum video length to 60 seconds, your video can range from GIF-like ease to short-film complexity, without taking too much time to produce.
With Boomerang, you can record video burst of up to 20 frames. The built-in app then speeds them and up loops them beginning to end and end to beginning—creating a fun, fast-forward-rewind effect. Like video posts, Boomerang has a Views counter so you can track how many people are watching and adjust your content creation strategy accordingly.
Something that has always deeply fascinated me is learning about the journey that has helped in the development of a majorly successful company get to where they are now. I absolutely love hearing about all of the strategies and tactics that have drastically helped in their growth as an organization, but also all of the obstacles that they had to overcome along the way.
The one thing that I have learned over the years having the great fortune of sitting down with executives from major organizations as well as successful startup founders is that there is a learning opportunity within their success for all of us to benefit from regardless of what industry one is in.
Recently, I had the great opportunity to sit down with the founders and Managing Directors Dick King and Mark Timmerman, along with Vice President David Modiano of City Capital Advisors (“City Capital”) based in Chicago, IL. City Capital is a uniquely positioned investment bank whose sole mission is to provide senior level expert advice and execution services to leading middle market companies and their owners.
In its relatively short 10 year history since Dick and Mark left 20 year careers at William Blair & Company, City Capital has successfully completed over 50 transactions aggregating over $4.0 billion in value. They advise owners and management of private and publicly held middle market companies, typically valued between $25 million and $500 million with merger and acquisition advisory, capital formation for executing leveraged buyouts and ownership recapitalizations, as well as executing corporate financial restructurings.
City Capital’s biggest and most notable merger assignment to date concluded just two weeks ago when they advised Indiana’s family-owned Jayco Corporation in a successful merger with publicly-traded Thor Industries Inc. for $576 million.
When sitting down with Dick, Mark, and David, we discussed how City Capital went from a small two-man show to becoming a leading deal broker and investment banking firm in the middle market space. Here are three things that City Capital credits to their success as well as help you to implement into your own business.
1. Find your niche market and grow there.
Whatever industry you are in, it’s absolutely vital that you find your niche market and then develop a laser like focus to direct all of your time and energy in servicing that space. When Dick and Mark started City Capital, they admit that they didn’t have a concise business plan, but the one thing that they did know was their niche market of middle-market companies and how they were going to bring extreme value there. You may be tempted to explore different, more potentially lucrative markets such as larger companies in City Capital’s case, but don’t give in. The leading companies that are dominating their markets make it a major priority to find their niche and then operate solely within the confines of that space.
Related: Find Your Niche in 60 Minutes or Less With These 4 Questions
2. Relationships matter most.
Co-founder and Managing Director, Dick King said, “We knew from the beginning that the one way we were going to differentiate ourselves was to build thriving business referral relationships. Everything in our business revolves around people and relationships, and that is one key area that we take very serious.” I personally talk a lot about the importance of relationships, and when analyzing and digging beneath the surface to see what truly makes City Capital stand out from the rest of the competition, it’s clear to see the strength of their professional relationships is at the top of the list.
One of the best things that you can do right now whether you are a startup or an established company is to place an enormous value on your relationships and always striving to give more than you take. This type of mentality will always serve your future success more than you can ever begin to imagine.
Related: If You Don't Build Relationships, Nothing Else Matters
3. Create a culture where everyone feels important.
Culture is and will forever always be a critical component in determining the health and success of any organization. The best organizations all the way from Fortune 500 companies down to small family-owned businesses with five employees create a culture where everyone feels important and wants to do everything possible to carry out the organization’s overall mission. When discussing culture, Mark Timmerman said, “We wanted to create a culture where not only everyone feels important, but is also part of a tangible contributing factor to the future of our success.” One of the ways that City Capital has created this culture is to not appoint a CEO. Even though Dick King and Mark Timmerman founded City Capital, they pride themselves in having developed a culture where other senior team members don’t view them as bosses.
As a leader, it’s your job to instill and demand a culture that makes everyone feel accountable mainly to themselves and of course to their customers. By creating a collaborative atmosphere and attracting highly-productive and talented senior investment bankers, it’s truly amazing what can happen. City Capital is another example of just how important culture truly is, regardless of how big an organization is.
It’s my hope that these three things that have greatly impacted the success and growth of City Capital Advisors can serve as a springboard in creating more success in your own business.
Measuring the return on investment (ROI) of social is still the biggest challenge for social media marketers in North America, according to eMarketer. Perhaps it’s not surprising, then, that their second-biggest challenge is securing budget and resources. After all, if you can’t show the ROI, where’s the motivation to make the investment in the first place?
The good news is that there’s no reason to be in the dark when it comes to tracking key indicators of ROI like website traffic, leads, and conversions. These can all be tracked with a few simple bits of code called UTM parameters—and you don’t need to be a programmer to get them working across your website and social media channels.
What are UTM parameters?
UTM parameters are short text codes added to a URL to track important data about website visitors and traffic sources.
UTM parameters work with analytics programs like Google Analytics to provide a detailed picture of your social media success, from the very high level (which networks are performing best) down to the granular details (which specific post drove the most traffic to a specific page).
Also known as UTM codes, UTM parameters are a variant of URL parameters. Of course, that raises the question, what are URL parameters? Like UTM parameters, they are short codes added to a URL. The difference is that URL parameters can be used to dynamically modify content on a website and have some tracking functionality, whereas UTM parameters are for specific tracking functions only.
There are five different UTM parameters: campaign source, campaign medium, campaign name, campaign term, and campaign content. A URL with all five UTM parameters attached would look something like this:
Since that’s a pretty ungainly looking link, knowing how to shorten links is an important part of using UTM codes. We’ll get into the details of what all the parameters mean, what they can track, and how to shorten links later on in this post.
In case you’re wondering what UTM stands for, it’s obvious—Urchin Tracking Module. Okay, maybe that’s not actually so obvious. The name comes from the Urchin Software Company, one of the original web analytics software developers. Google acquired the company in 2005 to create Google Analytics.
Why your business needs to use UTM parameters
UTM parameters provide a whole new world of data that offers three key benefits for social media managers:
Proving the value of social to decision-makers, helping you secure ongoing buy-in and boost your budget
Giving you an overall sense of where traffic is coming from and insight into what’s working and what’s not, so you can hone your strategy by focusing on the right networks with the right kind of posts
Allowing you to test individual posts head-to-head in classic A/B testing style, so you can get the best return on specific campaigns
Measuring and proving social media ROI
Like every aspect of marketing, for social media to be valued, it needs to demonstrate appropriate return on investment and contribute to the company’s business goals. Adding UTM parameters to your social links helps you measure and prove the value of your social media efforts by clearly demonstrating the impact on company revenue through lead generation, referral traffic, and conversions.
You can also get a clear sense of the return on investment for specific campaigns by using data from UTM tracking to find the cost to acquire a lead and cost to acquire a customer—both numbers that are important to those in the company who make decisions about how to allocate budgets.
Refining your social media strategy
Once you’re tracking and reporting on ROI, of course, it will make you look great if you can find ways to improve the results. Monitoring the impact of different social networks and campaigns allows you to clearly see where you’re getting the best bang for your buck, whether that’s in actual advertising dollars or just the internal costs of managing an organic social media strategy.
That information can help you make important decisions about where to focus your efforts. For example, maybe Twitter brings more traffic to your page, but Facebook creates more leads and conversions. Which one is a better use of your budget?
You can use that information to help set relevant and realistic goals, then track when you reach them, helping ensure you focus your social media efforts in the way that’s best for your particular organization.
A/B testing
Classic A/B testing or split testing allows you to test individual marketing variables on a small segment of your audience to see which works better, one at a time, before sending out a full launch. You can also use A/B testing to refine your strategy by testing and validating theories about what works best for your audience overall.
For example, you may think that social media posts with video always perform better. But is that actually true for your audience and based on your business goals? You can begin to test that theory by sharing two identical posts, one with a video and one without, tagged with appropriate codes in the campaign content parameter.
Of course, you’ll need more than just one test to prove an overall theory. Then, if you find that videos do indeed perform best, you can move on to testing what kinds of videos work best, and so on, to further refine your strategy.
For a great example of this in action, check out our blog post on how eHarmony used UTM parameters and A/B testing to find their most profitable type of social content.
How to use UTM parameters
Now that you know what UTM parameters are, and why it’s important to use them, it’s time to set yourself up to start using them on your social media posts.
Step 1: Set up Google Analytics
There’s no point in using tracking codes until you have a way to collect and analyze the data they provide. So, before we look at how to use URL parameters to track your social media posts, you need to set your website up with Google Analytics.
Create a free Google Analytics account and provide your website URL
Create a Google Tag Manager account to set up a container, which is a block of code you’ll use to manage how Google Analytics works with your site
Paste the container code onto every page of your website
Step 2: Add UTM parameters to your social media posts
UTM parameters send information to Google Analytics to track how much traffic your social media posts send to your website, and how well that traffic converts.
Here’s a closer look at the five available UTM parameters and what they track.
You can add UTM parameters directly within Hootsuite, or create links with UTM parameters using the Google Analytics Campaign URL builder that you can then paste into your posts.
Option 1: Add UTM parameters using Hootsuite
Here’s a quick look at how to add UTM parameters to your posts from within the Hootsuite dashboard.
1. Select your social profile and compose your message
2. Click Add a link
3. Paste or type a URL, then click the gear icon
4. Choose Google Analytics under Add custom URL parameters
5. Enter the parameters you want to track and their values (following the best practices for UTM naming conventions, which you’ll find at the bottom of this post)
6. Click Apply Parameters
7. Click Shrink to create a short link containing your UTM parameters and add it to your post
This video explains the process in more detail:
Learn how to get even more out of Hootsuite with free social media training from Hootsuite Academy.
Option 2: Create UTM parameters using the Google Analytics Campaign URL builder and paste them into your post
If you prefer, you can create your UTM parameters within Google Analytics, then paste the links into your social media posts.
1. Head to the Google Analytics Campaign URL builder
2. Enter the URL of the page you want to link to, then enter the values for the parameters you want to track
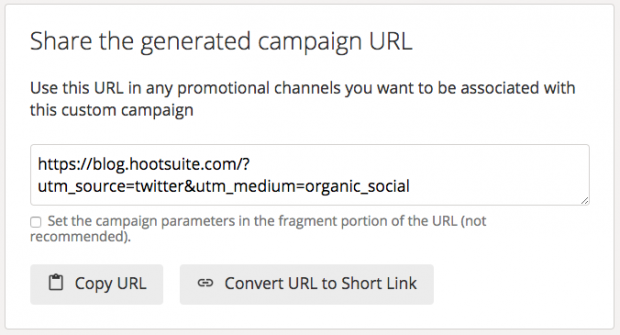
3. Scroll down to find the automatically generated campaign URL
4. Click Convert URL to Short Link, or click Copy URL to use a different URL shortener, like ow.ly
5. Copy and paste your short link into your social media post
Step 3: Track campaigns with UTM parameters
You now have the tools in place to gather and track data from your social media campaigns.
Option 1: Track traffic and conversions with Google Analytics
To get started, log into your Google Analytics account and follow these steps.
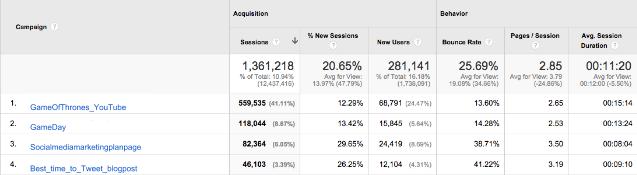
1. In the reporting tab on the left side, go to Acquisition, then Campaigns
2. Scroll down to see a list of all the campaigns you have created trackable URLs for, with traffic numbers and conversion rates
Option 2: Track Google Analytics data within the Hootsuite dashboard
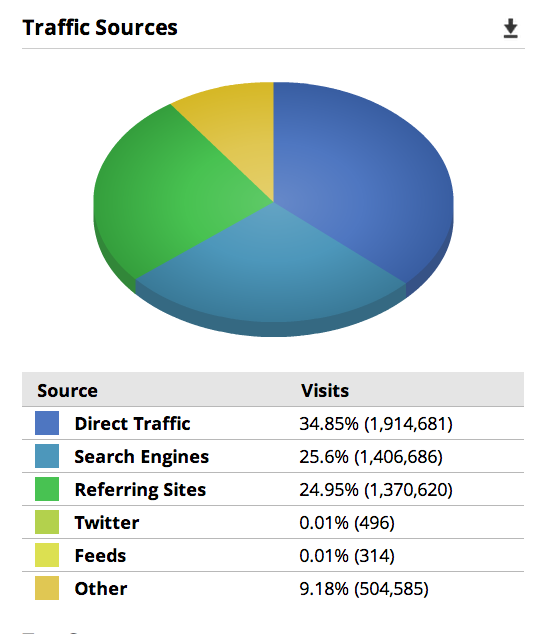
Hootsuite Professional users and above can track which social networks are bringing traffic to certain pages of your website, or to your website overall. The information is for the social network as a whole, rather than for specific URLs.
1. In the Hootsuite dashboard, click the Analytics icon (the bar graph) in the navigation column, then click Google Analytics
2. Choose the appropriate report owner from the drop-down list, then click Add Google account to give Hootsuite permission to access your Google Analytics data
3. Click Create Report to access a report that shows a site visitors overview, regional site traffic, the top content on your website, your top traffic sources, and more
Option 3: Track clicks with Hootsuite Analytics
If you used the ow.ly URL shortener to create your UTM parameter links, either within the Hootsuite dashboard or by pasting the Google-created long URL into ow.ly, you can track additional data using Hootsuite Analytics.
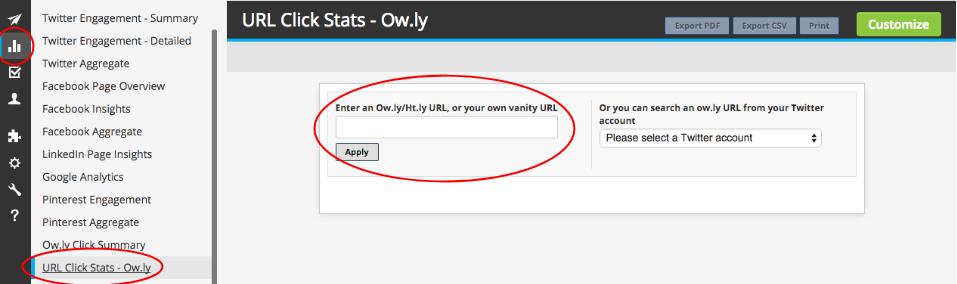
1. In the Hootsuite dashboard, click the Analytics icon in the navigation column, then click on Ow.ly Click Summary
2. Choose the appropriate report owner from the drop-down list and the Twitter account you want to track, then click Create Report to generate a report that shows total clicks per day, clicks by region, and your top referrers for ow.ly short links you’ve used in Twitter posts
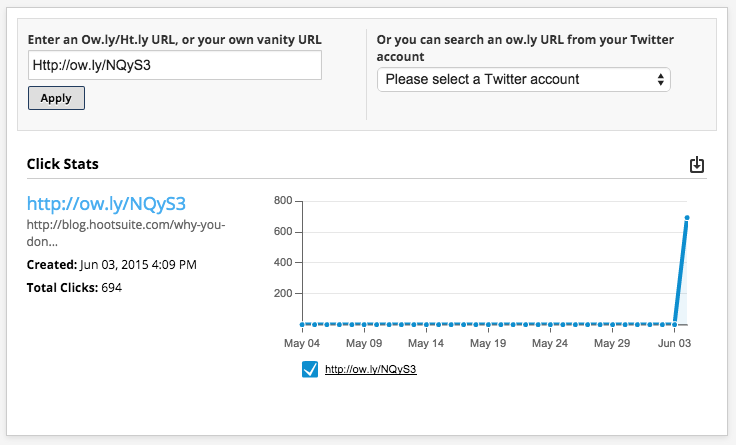
3. Go back to the navigation bar and click on URL Click Stats – Ow.ly, and enter the ow.ly URL you want to track
You’ll see a report that shows how many times the short link has been clicked since it was published, along with a graph showing clicks over time.
Step 4: Analyze the data your UTM parameters provide
Now that you’ve got all this data, you need to analyze what the numbers are telling you so you can see what’s working, what’s not, and how you can improve. This is a critical step to improving the success of your social media efforts.
Rather than just tallying up the numbers, work with your team to determine and track meaningful metrics for your organic social media posts and your paid social media ads. Analyze what types of posts and campaigns are not only driving traffic to your website, but leading to conversions or lead acquisition. After all, traffic is nice, but for most marketers, conversion is the Holy Grail.
Best practices for using UTM parameters
To make sure you get the most reliable data out of your UTM efforts, be sure to keep the following best practices in mind.
Use—and document—a consistent naming convention
Take a look back at the chart of the five UTM parameters and start to think about how you will describe the various categories. Keep in mind that it is important to be consistent, because inconsistent UTM parameters will create incomplete data.
Since you might have multiple people working on your social media tracking, it’s a good idea to create a master list of UTM parameters for the higher-level items like source and medium, and create a style guide that explains what rules to follow when creating parameters for new content, terms, and campaigns.
Keep in mind that even if you’re the only person working on this now, you could move on to another position, or your team could grow. Documenting the naming conventions (rather than keeping them all in your head) helps preserve all of your hard work and ensure your company’s valuable data is correct. Make sure everyone who needs to use UTM codes has viewing access to this document, but you may want to limit the ability to make changes to one or two key people.
While it’s up to you to decide which descriptors make the most sense for your particular business, there are a couple of rules all UTM code naming conventions should follow:
Stick to lower-case
UTM codes are case-sensitive, so facebook, Facebook, FaceBook, and FACEBOOK will all track separately, each giving you incomplete data for your Facebook tracking. Keep everything in lower-case to avoid inadvertently creating data tracking problems.
Use underscores instead of spaces
Spaces are another potential area for you to inadvertently create multiple codes representing the same thing, skewing your data. For example, organic-social, organic_social, organicsocial, and organic social will all track separately (and note that “organic social” with a space will become “organic%20social” in the URL, and nobody wants that). Replace all spaces with an underscore and document this decision in your UTM style guide to keep things consistent.
Track UTM links in a spreadsheet
Once you get started with UTM codes, the number of links you’re tracking will grow very quickly. Keeping them organized in a spreadsheet will make it easier to manage all of that information and help eliminate duplicate links.
Your spreadsheet should track each short link along with the full, pre-shortened URL, all of the individual UTM codes, and the date the shortened URL was created. Leave a field for notes so you can keep track of any important details.
Create a campaign preset for multiple posts
If you’re adding UTM parameters to your posts using Hootsuite, you can create a campaign preset that saves your UTM codes so you can apply them to each post in the campaign with just a couple of clicks. This not only saves you the effort of typing in each parameter manually, but also eliminates the possibility of inadvertently using slightly different codes that will skew your data.
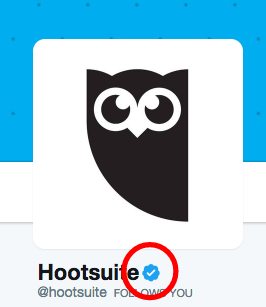
The blue verified checkmark is a symbol of trust on Twitter. Continue reading to discover why getting verified on Twitter is important—and how you can accomplish this.
CNN InternationalVerified account
@cnni
The benefits of getting verified on Twitter
Having the blue checkmark next to your account name signifies authority and authenticity. Not just anyone can get that coveted blue badge. Twitter’s team careful vets each submission.
Edelman’s Trust Barometer found that 85 percent of consumers choose to buy products or services from brands they trust. When users see that you are verified by Twitter, they know that they can trust your content—and your brand.
Verified users also have the ability to:
Opt-out of group Direct Messages
Restrict notifications to only other verified accounts
Tips to help you get verified on Twitter
Link to other verified Twitter accounts in your bio
Twitter’s vouching process recognizes your positive connections. If you are associated with other verified accounts, list them in your bio. For example, if your company’s Twitter account is verified you can include something like “Writer at @Hootsuite” in your bio to boost credibility.
Make sure your account is active
Twitter’s goal with the verified account process is to “help more people find great, high-quality accounts to follow.” If you aren’t tweeting often, you aren’t helping Twitter reach this goal.
Twitter has a responsibility to protect the quality of their community, and will not grant you verified status if your account is inactive. In order to be considered for verification, you need to show that you are consistently providing valuable content to your followers.
Have a high-quality image
Whether you use an official company logo or a professional and up-to-date photo, you need an image clearly visible on your Twitter profile.
And use your professional name (whether your given name or a stage name) and/or the name of your company. This needs to be consistent across platforms so:
Your branding is immediately recognizable
Twitter can confirm your identity
You can differentiate your business from others in the industry
Twitter recommends a profile image size of 400 x 400 pixels, and a header image dimension of 1500 x 1500 pixels. Adhere to these guidelines with a clear, on-brand image, and boost your chances of getting verified by Twitter.
Optimize your bio
In addition to having branded visuals, a clear Twitter bio helps increase the possibility of being approved for that coveted blue badge. If you are a business, include a description of your company and its mission statement.
If you are an individual, list your job title with links to other verified accounts where possible (as discussed above).
Whether you are writing a Twitter bio for a business or an individual, including a website will improve your chances of success with getting verified. This legitimizes your account and helps Twitter cross-check your identity.
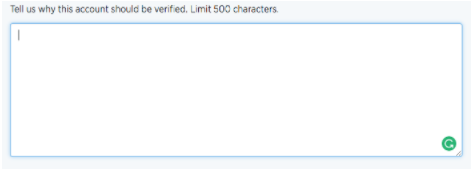
When applying for Twitter’s verification badge, you will be asked to submit a paragraph outlining why you deserve to be verified. As Twitter explains, “If the account represents a person, we want to understand their impact in their field. If it represents a corporation or company, let us know their mission.”
Instead of explaining why you want to get verified on Twitter, share the ways you believe your brand adds value to the Twitter community. How does your expertise benefit users? How are you working in the public interest? Make sure you answer these types of questions in your application with the benefits to Twitter in mind.
Be exact with your location
The connections made on Twitter often lead to real-life relationships that can benefit your business. So we recommend listing a precise geographical location in your Twitter bio.
Twitter has to verify the legitimacy of your business and understand your activity in the offline community. Listing your geographic region helps provide this information.
How to submit your Twitter profile for verification
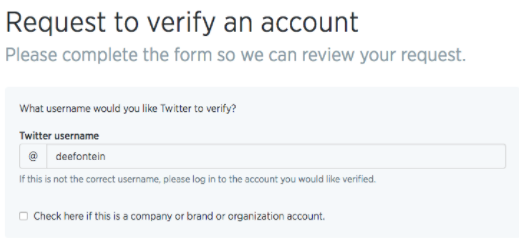
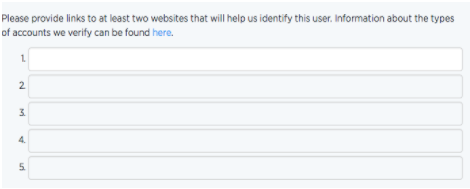
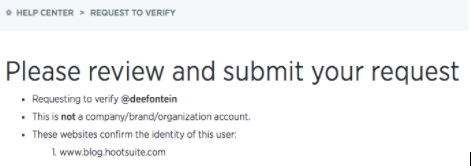
Add links to at least two websites Twitter can check to verify your identity. Twitter recommends choosing sites that “help express the account holder’s newsworthiness or relevancy in their field.”
Write and submit your case describing why you deserve to be verified.
5. Review and submit your request.
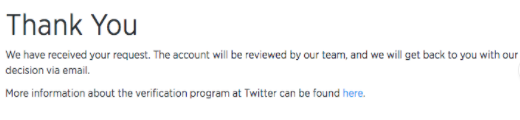
Wait for a response.
If Twitter approves your request, you will receive a Direct Message with a link and further instructions.
Once verified, we recommend you don’t change your account information as Twitter can revoke based on these alterations. If Twitter denies your request, you can re-submit your edited application again after 30 days.
Learning how to get verified on Twitter is a key step towards building a credible brand. Use the above guide to boost your chances of receiving that coveted blue checkmark—and establish yourself as a trusted source in your industry.
New tools have recently emerged to meet the evolving needs of busy social media marketers.
In this article, you’ll discover six tools that will improve your social media marketing workflow.
#1: Create User-generated Content Feeds With Waaffle
According to Yotpo, ads based on user-generated content (UGC) can get 4x higher click-through rates and a 50% lower cost per click (CPC) than average. Managing user-generated content campaigns can be tricky though. Waaffle simplifies the process by creating aggregate custom feeds based on any @ account or #hashtag.
Waaffle’s current “early bird” pricing starts at $9/month per campaign. To get started, create an account and attach your Twitter or Instagram profile. From here, you can set up campaigns to track content published by individual accounts or that contain a specific hashtag.
You can create Waaffle feeds based on individual accounts or specific hashtags.
You can then view content based on your feed parameters.
Waaffle displays content matching your campaign parameters.
Click the Analyse tab to learn more about the content you’ve aggregated.
You can find out more about your aggregated content on the Analyse tab.
Certainly, Waaffle is a valuable addition to your own UGC campaigns. However, you can also use the tool to: Monitor performance of your company accounts and hashtag campaigns. Publish content you’ve curated from other accounts to your feeds. Monitor your competitors’ accounts or hashtag campaigns to inform your own channel curation. #2: Curate and Bookmark Content from Influential Sources With Refind
Refind is a free tool that aims to address an issue every social media manager has faced: trying to remember an article you saw that would be perfect for sharing on your social profile. While Refind is a great option for curating personal articles to read later, it’s even more beneficial for loading your social channels with relevant updates.
The desktop version of the program is currently in beta, so you’ll need to submit your Twitter ID to see if you’ve been invited. If not, you have the options to join the waitlist or tweet about the app to gain priority access.
Enter your Twitter handle to see if you’re invited to the Refind desktop beta.
Refind’s iOS and Android apps are available to everyone, so you can access the tool on your smart device. A quick wizard walks you through setting up your Refind channel. First you’re prompted to choose your interests.
Choose interests for your Refind account.
Next you’re offered suggestions for influencers to follow in these spaces.
Refind suggests relevant influencers you may want to follow.
The final step shows you how to save links from your device. You can also choose if you want to automatically import links you share on Twitter.
Select the check box to import the links you’ve shared on Twitter.
Once signup is complete, you’re taken to the welcome screen where you can take a tour of the app or begin browsing links that have been selected for you.
Refind’s welcome screen shows recommendations for you.
Within each suggested link, Refind provides buttons that let you save the link, send it directly to Twitter, or perform a number of other actions.
With each article, you’ll see buttons that allow you to save, tweet, or perform other actions on the article.
Here are a few tips for getting the most out of this tool for social media management: Save interesting links you want to upload to your social profiles later. Follow influencers in your industry to curate links they share for your audience. Check a link’s stats to see how many others have shared it (and therefore, how interesting your audience might find it). #3: Add Text Overlay to Social Media Video With Rocketium
Rocketium is one of the simplest ways to create overlaid-text videos for your social media and content marketing campaigns. Use it to create quick videos (like BuzzFeed’s Tasty series) to fill out your social profiles.
This tool is free for watermarked videos; paid plans at $19/month and $49/month will unlock premium features.
Rocketium’s video editor consists of two screens. On the first screen, add your content including images, videos, and captions. When you’re finished, click Continue in the upper-right corner.
Add content to create your Rocketium video.
On the next screen, customize your video with different animation styles, music clips, aspect ratios, and more. When you’re done, click Finish.
Customize your Rocketium video. #4: Optimize and Automate Social Posting via Slack With Yala
If you use Slack, you need the Yala bot. This free tool uses machine learning algorithms to identify your social following’s most active times and lets you auto-schedule “series” of posts from within Slack. Yala currently works with Facebook and Twitter, and the team is exploring offering a similar service through Facebook Messenger.
To get started, click the Add to Slack button.
Click Add to Slack to install the Yala integration.
Once you grant the appropriate permissions, Yala will initiate a tutorial via private message to help you connect your social accounts.
Yala takes you on a quick tour of the app.
Once you’ve added a Facebook or Twitter profile, Yala will make recommendations about your ideal posting schedule:
Yala recommends posting times for you.
You can call Yala at any time for instructions or to schedule posts (including both text posts or images with text). It’s a simple, great option if your team already spends a lot of time on Slack. #5: Identify and Schedule Topical Content With Quuu
Quuu is an automated social scheduling tool that suggests updates for your social profiles based on topics you choose.
The tool ties into Buffer and HubSpot, and available features include the ability to receive content suggestions for multiple profiles and manually or automatically approve suggestions. You can also promote your own content pieces with Quuu Promote.
A limited free plan is available; paid plans begin at $10/month.
Quuu is easy to set up. After you create an account, select the platform you’d like to send your suggestions to.
Quuu integrates with both Buffer and HubSpot.
Then you’ll need to grant the tool you selected access to your account.
Once you’ve completed the sign-up process, choose from different interest categories based on your niche and its keywords. (The free plan limits you to five categories.)
You can select up to five categories with Quuu’s free plan.
Also, set the number of suggestions you’d like to receive per day. (You’re limited to two per day on the free plan.)
You can receive two suggestions per day with the free Quuu plan.
Once your account is set up, suggestions will automatically be sent to your Buffer or HubSpot account, where you’ll be able to manually approve the tool’s suggestions (unless you’ve set your updates to publish automatically). #6: Monitor Social Ad Spend via Slack With Reveal
Another helpful Slack bot, Reveal, brings your paid ad campaigns into your chat tool. The goal of the app essentially is to warn you when your ads are losing money. Paid plans begin at $10/month and 14-day free trials are available.
To add this tool, click the Add to Slack button on the Reveal homepage. It then leads you through the same permission-granting steps as Yala. Once set, Reveal offers a similar set of tutorials.
Like Yala, Reveal takes you on a tour of the app.
For best results, use Reveal’s reporting features to monitor your daily, weekly, and monthly campaign performance and receive alerts when your CPC changes significantly.
Conclusion
New social media management tools hit the landscape every day. While these are some that are worth checking out, there are plenty of others being launched to address the common challenges of social media marketers.